I designed my Navigator design quite a few years back now, originally designed as a race trainer which would teach late teen aged sailers the basics of handling the small high performance keel boats that form Yachting New Zealands core training fleet without having to spend megabucks to get their own boat, the design was chosen by a repeat customer to be a cruiser.
Some mods to the centerboard and rig later, a different cockpit layout and we had Navigator as we now know it.
There are around 700 sets of plans sold to date, a figure which makes me very proud, and there are Navigators sailing on waters I've never seen.
Some of those boats are beautifully built, lovely boats built with loving care and the best of materials.
I've been following Suzy J's blog and Wooden Boat forum thread for some time, and thought thatnow she has a pic posted of her ship outside in the sun it was time to bring this to the attention of my blog readers.
So check this out people,
http://forum.woodenboat.com/showthread.php?176883-Elena-a-Welsford-Navigator-cruising-sloop
and here is her own blog. Wonderful stuff, I wish she were closer so I could visit.
http://suzyj.blogspot.com
Thanks Suzy.
John Welsford
Monday, April 27, 2015

Tuesday, April 21, 2015
Got the camera working so here's the post I missed on Monday
Its Monday That used to be the worst day of the week, but now I’m working
piecemeal at several things or sometimes not at all? Well, the young ones are
all back at school, the parents who took time away from work to be with their
kids during school break (well done them!) are back at work, and it’s a nice
autumn day here so it’s a better day than most.
I’m sitting on my thinking chair here in my workshop waiting for
some epoxy to kick off so I can do the next part of assembling the rudder stock
for SEI, and sipping on my mug of tea.
The rudder for SEI is a bit unusual, I’m trying some new thoughts
here. Being double ended hanging over
the stern to get the rudder blade up and down is a bit fraught, so I’ve built in channels for the lines that
do that, and located the pivot a bit further aft than usual to give some leverage
to do that.
In addition to this I’ve made the lower end of the rudder stock
wider than normal, taken it about 125mm below the waterline and put an end
plate on it so it will ( hopefully) be enough to steer the boat when the rudder
blade is up and I’m creeping over the shallows.
That extra depth also means I’m able to put the rudder fittings a
little further apart which makes things stronger.
On tools. My very elderly uncle has been a joiner, a professional
worker of wood, all his life. Among the
things he’s created is a spiral staircase with no central pole and a cathedral
rose window, he’s built a replica of an 1840s wooden lecturn for a university,
and worked well into his 70s rather than sit idle.
He’s gradually giving me a lot of the tools from his home workshop.
Much of the gear is light, and cheap, his workplace had every piece
of machinery you can imagine, and he had enough of a reputation there to be
able to use the serious machinery at work for his own projects, so cheap, light
and simple in his little shop was ok. Some items have been a very useful
addition to my collection, some will be quietly farmed out to people who will
find them adequate for the occasional light task.
Among the things that I have inherited is an unused, very recently
purchased Ryobi combination linisher (fixed belt sander) and bench grinder. 370
watt.

It does do a job, the light is handy when sharpening chisels or planes at night, the see through guard on its moveable arm works well, the water tray is way too small and if you have a machine of this general type you do need some suction on it to contain the dust from the sander. I bought a brand new Shop Vac the other day for $65 and its going under the bench and will have a switch installed under the bench top edge just below the Ryobis switch.
I am not Ryobi’s greatest fan, product that I’ve bought in the past
has not been up to the use that I put it to and when I get them to repair I
find that if its more than brushes or a duff switch its not worth bothering.
So how is this performing?
I use the grinder for planes and chisels, the wheel goes around ok,
but you’d want to change the coarse grey wheel for a softer 80 grit wheel to
reduce the burning of the blade that you are grinding.
The toolrest is a frustrating thing for sharpening tools on. I’m going to make a new one, the standard one
is too short across, has a groove in it for sharpening drill bits ( totally
useless) which makes the hand bump when sliding a plane blade back and forth
across the wheel, and the dresser that
came with it flew to bits about the third time I used it. (I have a “proper” one).
The linisher, that’s the sanding belt thing on the other end, works
about well enough to show me that I’d benefit a lot from owning a decent one.
Its belt is small so tends to load up fairly quickly, but a belt
cleaner block can take care of that. Its
top wheel is masked by a guard that comes up too high so you cant use the round
to get inside a curve, its platen behind the belt does not go down far enough
to support product that is on the tool rest, or the tool rest needs to be
higher up the belt. Its also very short of power, taking very little to stall
it. All that and the tracking adjustment is a joke.
So what do I think of it?
Well, its actually pretty useful for the price that they are, I use
it a lot and it works. But if you are serious you’ll spend a few more bucks on
a better one, you’ll forget the pain in the pocket far sooner than the repeated
annoyance of a machine that is almost
but not quite up to the job.
Progress on SEI? I promised a
correspondent that I’d put some pics up today,
I’ve got the gunwale inners all rounded over, the oarlock blocks mounted
and the brace that takes the strain of
the anchor cleat fitted to the underside of the bow breasthook, I’ve fitted the braces for the forward
extensions to the stern seat so that’s getting close to ready.
I’ve got the daggerboard ready to paint, the rudder stock all
laminated up, and the rudder blade ready for fairing off.
She’s looking good, filleting proceeds slowly, that’s about my least
favourite job.
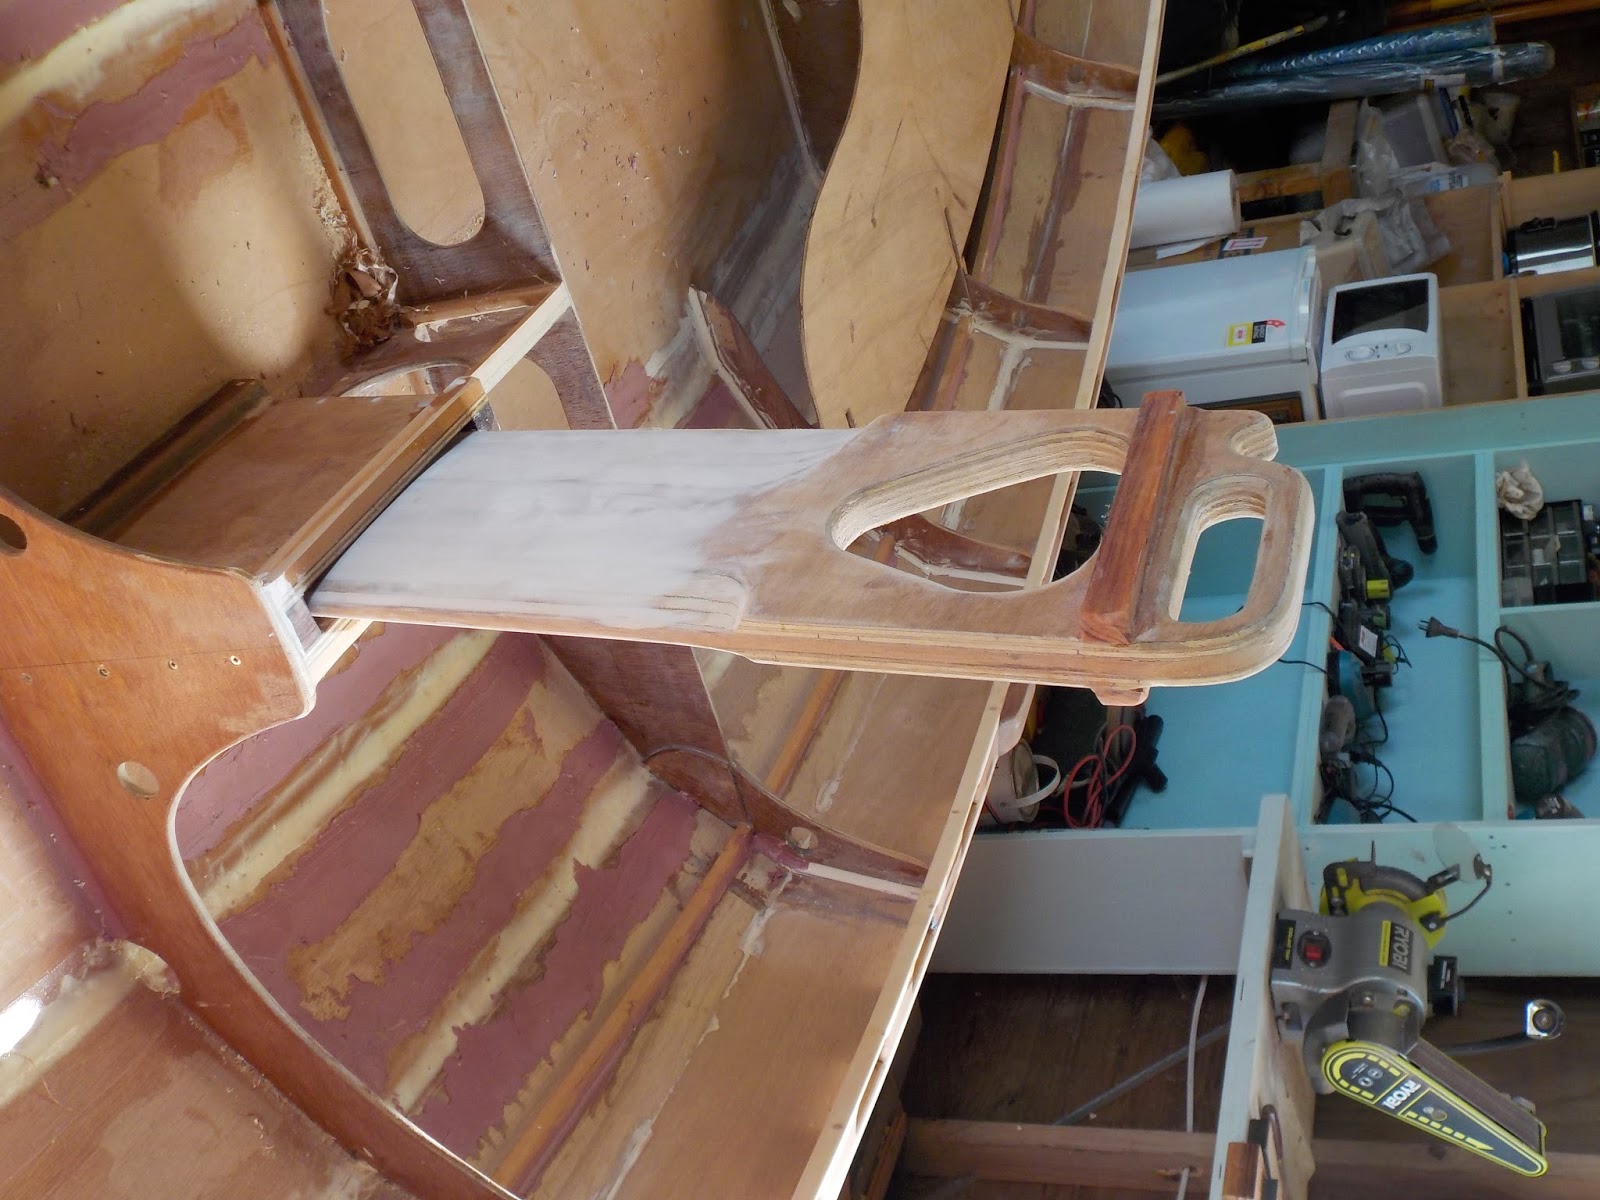 | ||||||
The daggerboard, three layers of 9mm plywood with a hardwood inserted leading edge. The tricky little notch at the back of the handle is to take a shock cord hold down when its down, that runs from the holes you see in the frame "this side" of the daggerboard case and up over that notch.
When there is a need to hold the board part way up, that same shock cord loop goes around the after edge of the 'board above the top of the 'case.

View from aft.

View from forward.
By the way, I can pick either end up with one hand, she could be a little under her design weight. Good, easier to drag up a beach or put on a trailer.
Monday, April 20, 2015
A new Sundowner
I've a nice long post all written out, pics taken, captions done, all that stuff but for some reason my lappy wont read the camera card. Grrr!
So it will wait for a little while, and just to show that I'm not asleep on the job here, I've pulled up one of my favorite threads on WoodenBoat forum. Mal, otherwise known as "Quest" over there in Oz is building one of my little "Sundowner" cruising yachts. He's kept at the job, posting pics regularly and telling readers of the forum what he's done each time, its looking good.
He's up to the stage where she is really looking like the little ship that she will become, quite a bit of the interior is in, the ballast has been cast and is bolted on, the decks and cabin are in the process of being fiberglassed and hatches are being worked on.
He's doing well, go and have a look. I'll see whats upsetting my 'puter and see why it wont talk to my camera.
http://forum.woodenboat.com/showthread.php?148391-Welsford-Sundowner-build&p=4516673#post4516673
So it will wait for a little while, and just to show that I'm not asleep on the job here, I've pulled up one of my favorite threads on WoodenBoat forum. Mal, otherwise known as "Quest" over there in Oz is building one of my little "Sundowner" cruising yachts. He's kept at the job, posting pics regularly and telling readers of the forum what he's done each time, its looking good.
He's up to the stage where she is really looking like the little ship that she will become, quite a bit of the interior is in, the ballast has been cast and is bolted on, the decks and cabin are in the process of being fiberglassed and hatches are being worked on.
He's doing well, go and have a look. I'll see whats upsetting my 'puter and see why it wont talk to my camera.
http://forum.woodenboat.com/showthread.php?148391-Welsford-Sundowner-build&p=4516673#post4516673
Sunday, April 12, 2015
Happenings, progress and events to come.
Its been a week in which I did not achieve much, but felt as though
I’d been working my butt off. Sick relative needs help, my mother at 90 needs a
gentle watch kept on her, busy at my “ex’s “ house, some engineering work and
two days downtime after the blood clinic. So, nothing done on the drawing
board, I missed a posting, but am back on track again.
Catchup time, life seems to be mostly either catching up or trying
to keep up. Shouldn’t complain, it could be a lot worse.
I got a message about my friend Stuart Reid, some of who’s plans
feature in my catalogue. He lost his
wife Rose last year, and early this year had a fall that left him completely
paralysed, he’s in a convalescent home where I can visit him now, and I’ll be
making the effort to get down there to say hello.
As I write its bucketing down with rain outside, I’m snug in my bunk
writing up bits and pieces. Once that’s done will be out in the shed working on
SEI.
I need to get her out of the shed, or at least hung in the rafters
so I can build the planking model for the Saturday Night Special
prototype. The proof of concept boat
works pretty well, but there are some slight changes to incorporate before the
volunteer builders start on building six for next years T200.
These will be used in much the same way as the “Duck” fleet in last
years T200, proceeds to Cancer Research,
www.duckworksmagazine.com
and Small Craft Advisor Magazine are the main sponsors, movers and shakers for
this project.
The “proof” boat has been out a few times now, and the reports are
that she handles nicely, is reasonably quick, although it has not been sailed
in the winds that its designed for ( 20 knots quartering tailwind, the usual
Texas 200 conditions) there is no reason to think that its needing any change
of shape.
I’d like to think too that there will be a SCAMP fleet there, will
be trying to persuade my friend Jackie Monies to bring her SCAMP. Not the famous red one, but her very own, a
Gig Harbour Beige with Chocolate trim Fiberglass one that will be called
“Cowboy Cookies”. Now anyone who knows
Jackie will know about cowboy cookies, and I think it’s a great name for her
SCAMP.
She’ll be at the SCAMP Skills weekend at Port Townsend, has
consented to be “Camp Mother” at SCAMP Camp in July and will be at the Pocket
Yacht Palooza and the Red Lantern Rally .
Scroll down to find information “here”.
http://www.pocketyachters.com/Port_Townsend_Pocket_Yachters/2015_Calendar_of_Events.html
But back to Saturday Night Special, the length is to be adjusted to
just under 14 ft so they wont have to be registered, the bottom needs
stiffening, and there is to be a swing centreboard rather than a daggerboard in
recognition of the many shallows on the course.
I’m working on making sure that the boat is bulletproof, no broken
rudders or mast steps.
Josh Colvin, Editor in Chief and head honcho at Small Craft Advisor
has recovered sufficiently from his last years trip up the Texas Coast in a
“Duck” to partner me in one of the boats, so the SNS fleet will have the two of
us along to entertain them. It will be a first for me, I’m looking forward to
the event, 14 months away I think, lots to do between now and then.
Back in the boatshed here, the gunwale structures are in SEI, she is
getting her oarlock blocks fitted today, I’ve cut them out of a lump of scrap
Kwila which is damn difficult stuff to get a decent finish on. Its got lots of curly and reverse grain, is
oily and difficult to glue, I use some because I inherited a trailerload of
short 3 x 7s a few years ago and being hard, durable and stable its handy for
all sorts but I back the glue up with bolts or screws.
So today I have the blocks made up, have cut them to shape and even
made an attempt to fit the curve of the sides. I’ve made the bungs that will
cover the screw heads, and have a piece of brass strap that will make the top
and bottom oarlock plates.
A nice gentle job in the shed, radio on just loud enough to hear
over the rain on the roof, just right for a day like this one.
Its light outside now, 6 30 am on the slide through autumn and into
winter, so I’d best get up and get on with it.
Saturday, March 21, 2015
SEI. Fitting the gunwales
SEI.
Progress. Gunwale time.
I found some short pieces of mahogany 2x4
in my collection, many years ago it had come out of a bank that was being
refurbished. I’d spotted it in a dumpster on the footpath, managed to get some
of the shorter pieces into my car and put it in my pile of “resources to be
used for building boats”.
That was probably 30 years ago, and I’m
down to the last few bits, two of which are now the gunwale blocking for SEI.
The task at hand is to build the gunwale
structure, that’s the blocking and inwale.
To go back a little, when I drew SEI I’d
pinched her top plank a little midships to get her narrower there to make it
easier to get oars the right length without being ridiculously long, but when I
put the boat together I could not get them to lie fair, so I’ve let the top
edge spring out and pulled them fair by wrapping the gunwale strip around and
glueing it in place.
I’ve put fillers in between the frames and
the inside surface of the planks where its sprung out and changed the
dimensions on the plans to correspond.
All that means that I cant screw the
blocking in through the planks then cover the screws with the gunwale strip,
until the inwale is in place its that outer that’s holding it all fair.
I’ll put those screws in later and cover
the heads with bungs, but in the meantime I’m cutting the blocking to fit the
inside curve and angle required, glueing the blocks in place and rounding all
the square edges.
Each block has to fit the curve of the
side, be shaved on the inside to match that curve, angled on the outside to fit
the varying angle of the plank which means a twist in the bevel, and it has to
be the same angle from horizontal as all the others. It sounds fussy work, but in reality its not
difficult, just a bit slow.

All greasy with glue, it takes some fiddling to get the blocks perfectly positioned with the clamps on.
The long pieces at the bow and stern are to
take chocks ( fairleads in “English” ) for anchor or mooring lines, and the
spacing of the blocking is such that all the frame heads are covered with a
block slotted over each.

I filleted the frames to the planking before I fitted the inwale, its much easier to access without that in the way.
The nitrile gloves by the way are "Black Dragon" brand, from Autolink Distributors. They are the best I've found to date, way better than the Ansell ones, but do get them a size up on a perfect fit. Like any of these gloves if they are stretched tight it takes very little to tear them.
The blocking on one side is done, the other side will be
fitted in the next day or so.
For the inwale I’m using the leftover
strips from the mast material, they are about 25 x 10mm, and I’ll laminate two
in on each side.

Dry fitted, just sprung into place to test the fit, from here it came out, had the lower inner corner rounded and sanded, then the glue was mixed up.
Just fitted one, rounded the inside lower
edge first, sanded the saw marks off, then cut it to length. Glued one end in, clamped it into position,
applied the glue to the rest and then sprung it into place.


I'm told that its possible to have too many clamps, I can understand the theory but have yet to meet a boatbuilder who has hit that limit.
Looks good, I’ll see how it feels before
making the decision as to whether or not to fit a second lamination to the
inwale.
Its my mums 90th birthday
tomorrow, and we’re taking her out to a nice restaurant for lunch, so what I do
today will have a couple of days for the glue to set up hard.
When gunwale on the other side is done the
mast box and seat tops can be fitted,
not so far to go now.
Mind you, its about this stage of the
project when the builder starts to see the finish line but forgets that all the
really slow, time consuming finishing details are still to be done.
Saturday, March 14, 2015
Japanese pull saws,
About 30 years ago I was lucky enough to
walk into a very special shop, all woodworking tools, and it was closing
down. The old Yorkshireman who ran it
was retiring, and it was all to be sold.
Off to the bank, came back with a wad of
cash and I told him to keep count and put his hand up when I ran out.
Wow!
One of the things that I bought was a
Japanese pull saw, I’d read about them,
but had never ever seen one let alone used one,
but it was a revelation to someone who’d been using ordinary carpenters saws
and a ratty old tenon saw. Fast, smooth
cutting, effortless, and accurate, way better than anything I’d ever used
before.
I bought a handle, and three blades plus
sharpening files ( known as “feather files” after their unique shape) and used
them for many years.
Two touch-ups on the teeth with the file
were all I could manage, but even so those saws last a long time and it was
only relatively recently that they were so worn that I could not make progress
on ordinary wood.
There were a number of mail order tool
companies who had these but they were all wildly expensive, amazing tools that
had been hammered by 99 year old master sawmakers and tempered in the blood of
virgins born on the eastern slopes of the sacred mountain as the sun rose above
the horizon on the birthday of the emperor (etc. etc. , you get the picture)
and my budget did not stretch to that.
It was about that time I met Chuck
Leinweber and his brand new BoatBuilders supply company. Bingo, one of the first transactions was my
purchase of one of his Japanese Pull Saws,
I don’t bother fussing around sharpening them any more, the files are
hard to find and very costly so I just buy a new blade now and again. Cheap, good, does exactly the same job as the
one described above, and I would not be without them.
Why I am on about it today, is that I’ve
just replaced the blade, I build a boat most years, cut through epoxy and the
glue in plywood, hit the occasional nail or screw, cut hardwoods and soft,
resinous and salicaceous woods, even plastics on occasion. The blades generally
last me for a couple of years even with this kind of abuse.
Points?
10/10. If you are into building
boats, and don’t have one, get one, and a spare blade.
http://www.duckworksbbs.com/tools/cutting.htm


Rip saw teeth on one side, and cross cut on the other, fine kerf, ( slot) easy to use, very clean smooth cut, and versatile.
'Nother cyclone update
The storm is still on its way south toward
New Zealand but the latest information has it downgraded from Cat 5 to Category
4, that’s still nasty, but it looks as though the cooler waters its
encountering as it comes out of the tropics is taking some of the sting out of
it.
As well, the track its taking is east of
our North Island, maybe 100 miles or so off the coast which sounds like a lot,
but this storm is several hundred miles across.
Still, that distance puts us out of the
worst.
Right now the rain has hit, its windy, the
Marine Nowcasting is saying 45 knots and the forecast is for 55 knots in a few
hours, but that’s not really a big
deal. There will be some damage, and yes
it’s a big deal for those involved but the damage wont be really widespread.
I was concerned that the tidal surge would be an issue, but its neaps so the high tide is not as high as it might have been, and although high tide half an hour ago was definitely higher than the almanac said, it was not high enough to do any harm.
Subscribe to:
Posts (Atom)