Tuesday, May 31, 2011

Making holes in things.

Making holes in things.
I use my two cordless drills a lot when boatbuilding, one for pilot holes and the other as a powered screwdriver.  I have a friend who was an electrical engineer in the Merchant Navy and he tells me that if these had been around he’d still be at sea instead of teaching kids who don’t want to learn and rueing his occupational overuse sore wrists and forearms.
But drilling wood, especially small sized holes, tends to clog the drill bit which if one is not careful can break the bit off which then requires some work with a chisel ( which then requires grinding and sharpening to get the nick out of the edge after digging the broken drill bit end out ) to retrieve it.
The ordinary engineering twist drill is not intended for use in wood, they work, and like everyone else I use them most of the time, but the above problem is only one of the issues in using the wrong tool. 
Years ago I came across specialist brad pointed woodworking drill bits on boring machines, they had special chucks which is just as well or I’d have been collecting them for my own use,  but at that time I could not buy them to suit my own drills for love nor money.
Recently though, while they are uncommon  I’ve seen them about, even managed to buy the occasional one.  I use 1/8in (3.2mm) bits a lot, and had been working away using the last one in my collection and it was getting desperately blunt, when I was in a local hardware store looking for other things.  Thought I’d look at the drill stocks in the tool section just in case, and while asking the lovely young lady there if they had any of these things, then explaining in detail what it was that I wanted ( be polite! ) , and looking over the display with her we were interrupted by a gent who was obviously a trade rep restocking.
Turned out that Neil Palmer was the local Territory Manager for Robt Bosch, and like some of the other better power tool manufacturers Bosch are supplying an increasingly wide range of tooling and accessories for their tools.
Neil had heard my request, said he had samples in his car and went out to get same. He came back with a set of seven drill bits from 3 to 10 mm in 1mm steps, ( no 9mm one). We discussed the use, he noted that I was boatbuilding and showed me the new tooling range for their oscillating Multi Cutter tool.  He was keen to show me the titanium nitride coated saw blade which will cut wood infested with nails and screws, fiberglass, plastics, copper tubing and just about anything you’re likely to hit when doing repair and restoration work on an old boat.  If you’re like me of course you manage to do this when building something new as well.
Heres a link to the multitool itself. They do a cordless one as well.
He mentioned too that these fit Fein multi cutters as well!  Nice gear. I want one, but it has to wait until I’ve bought one of their new 14.4 volt cordless drills.
Back to drills, on asking how much, I was presented with the sample pack and told to go and try them.  Wow!  So I did.
These drill bits have a steeper flute than the engineering ones, the outside of the spiral being relief ground to reduce binding and lessen the chance of breaking the bit in a deep hole.  The point in the middle is longer (higher?  Something like that) than the usual ones which makes it easy to target, just put the point where you want the hole,  press and you’re on your way, no wandering.
They drill quickly and cleanly, much less breakout than the usual twist drills, and seem to hold their edge very well even when pushing through reinforced glue and plywood.
Nice work Robt Bosch, and thanks Neil.  Ten out of Ten.
I’m sure that your local Bosch stockist will be able to get these .

Yes I sound as though they are paying me, but I have several Bosch tools, their random orbital sanders in particular have had a terrible amount of abuse as had the angle grinder and they both do a good job and survive very well. These specialised woodworking drill bits are superb,  I’m a fan.
John Welsford


Sunday, May 8, 2011

Saturday Night Special, a day or so later.

Out in the shed,
I’m not doing well today, dog tired in spite of a sleep in, off to the Doc today for my monthly visit  so I’m taking it quietly and am sitting here annoying you instead of working.
Its been a long time since I built a boat, I’ve got started on several projects but life seems to be something that happens in spite of your best planning, and with issues such as house building, health, employment and such those projects never got much beyond a tentative start.
But the house is, after several years of building, pretty much done.  There are always more things to do but it should be signed off by the building inspectors within a week or three, employment is still an issue, I’ve been made redundant from my last three full time jobs and have given up on that so as the health issue improves I’m working more on design and selling more boat plans.  That’s not easy in the current economic climate but there seem to be signs that things are coming right in some parts of the world, and hopefully that will continue.
Sailing my little gaff sloop has given me a real taste for being back out on the water, the issues that stopped boatbuilding had kept me away from sailing for some years but now that things are on the improve and I’m getting some time afloat the passion is returning, its like an awakening, and about time too.
So, the workshop tidy is coming along, I can get at all the machinery, the bench is tidy enough to work on, I spent a whole afternoon just reorganising the screws and fastenings, and while the floor is not properly clear I can at least walk about without tripping over things all the time.
My wee boat which I don’t refer to by her given name of “May” which is a bit dainty for what is really a pretty tough little adventurer and I’m going to rename her when inspiration strikes, is a bit heavy and a bit time consuming to take out on the lake for a quick sail of an evening so I am building a boat with that in mind.
Now, in the past every boat I’ve built (I’m up to 24 so far) has been an opportunity to try out a bunch of ideas and this one is no different.  Last year my friend Blair and I pumped out the hull of a light planing sailboat called “Saturday Night Special”.  It was a 3.9m (13 ft) stitch and tape balance lug rigged boat, designed so that the builder could make up the rudder, centreboard, frames and transom, put all the bits plus sail into a mountain bike transporter bag along with some basic tools and fly into an event like the Texas 200 (http://www.texas200.com/ do read the photos and accounts,  both entertaining and fascinating ) and build the boat before participating.
The vision was that a team of two or three would arrive at a venue where some shelter would be available, rent a van, go to the local big box hardware for cheap plywood and lumber, have the very few fittings required plus epoxy and some glass cloth shipped in beforehand from www.duckworksmagazine.com or similar, and for spars buy some alloy pipe from the likes of  http://www.onlinemetals.com/index.cfm.
Blair and I proved that with some organisation that a boat can be hung together in four or five days, and three couples could easily have three boats sailing inside a week.  Rough, but watertight, painted and sailing.
At the end of the event, the expensive parts can go back in the bike bag and back on the plane while some lucky soul would get a free boat, or it could have a Viking funeral on the beach.
The issue we were trying to solve was how to participate in the event when it’s not practical to transport a boat from somewhere far away (Blair and I are in New Zealand, or at least I am and he’ll be back in a few months).  Quick and dirty was the aim, but fast, easily handled, quick to rig, stable, safe in difficult conditions, and in this case designed for sustained high speeds off the wind while retaining good windward performance so the boat can be sailed upwind away from lee shore traps.
The prevailing wind on the Texas 200 course at that time of year is a strong quartering tailwind which often sets up a short steep chop in the shallow waters inside the banks that shield the course from the Gulf of Mexico,  so S.N.S was drawn up to suit those specific conditions.
Blair and I got the hull done, stitch and tape is not my favourite way of building and the cheap plywood did not bend as fairly as I’d like but the boat will work ok all the same.  Blair has had “life” happen to him, and the project is sitting while he is away out of the country working so we’ve not seen her in the water as yet. But I had all the frame templates, my tidy up revealed that I had half a dozen sheets of plywood, a heap of various bits of wood, and a whole lot of epoxy.
So, I’m started.  Here is “Sunday Night Special”, that’s what you get when you begin with a Saturday Night Special and think about it for a bit longer.
The piece of plywood I have for the bottom is longer than the original so I’ve stretched the boat a bit and its now 4450 long,  1700 wide, 9.8 sq m of sail about 70 kg in weight   ( 14ft 6in x 6ft 6in 105 sq ft  154 lbs )
I’m building “Sunday”  stringers over frames, but the frames are further apart than is usual as I’m trying to see where the limits are in that respect, and there are a few other experiments happening as well.
There will be a big buoyancy tank each end, wide side decks to sit on but no seats, balance lugsail on free standing mast, on halyard, one downhaul, one sheet, daggerboard and rudder.  As simple as its possible to be, note no seats, that’s weight and complication that costs time and materials to build and is weight to lug around.  If you want to be comfortable in this boat, go and buy a pool bean bag and tie it in with a lanyard so it can’t blow away.
This is a rough build, quick and dirty, uses leftover and scrap materials. It’s a proof of concept boat, not intended to be an outstanding example of classical boatbuilding, as long as it doesn’t break and the water doesn’t come in that’s fine by me.  (no comments about the build quality from the cheap seats please)
If it works, there will be plans.
Watch this space!
John W
From the drawing I built this planking model, its 1/10 scale so is about 1.3m ( 4ft 4in ) long, planked up with doorskin MDF its accurate to about 2mm or so and the panel shapes were taken off and scaled up.

The bottom and chines laid out, stem up, and Blair is just beginning to lace the panels together before pulling the chine panels up to the stem.  Cable ties proved to be inadequate, ok for handcuffing terrorists but not for keeping plywood panels in line.

Here is "Saturday" all planked up, the centercase goes ahead of the frame up there  just forward of midships.  There are a few wedges and fillets of filler to put in yet as this cheap plywood is not very co-operative.

Half the deck on, the idea is that the crew will sit on the side decks or in the bottom of the boat, no seats, no frills, cheap fares, peanuts and coke for inflight meals.

The beginning of "Sunday".  I'm building on a jig this time, the cross members hold her bottom in the right fore and aft curve and level across, the stringers are very roughly ( you'll hear  that phrase a lot on this project) pre bevelled to take the chine panel and the stem will be the next thing to be added to the structure.

A couple of weeks later, had the time and energy to go out and do some more.  I said that the workshop was tidier, you should have seen the mess before!
Here I have the transom, after frame, midships and bow frame, stem, king plank and lower mast step in place.

View from forward, that vertical wedge shape is the stem, there will be a rounded capping fitted after the plywood is all on.  

Mast step, seriously well fastened in, this is possibly the most highly stressed item in the boat so I made very sure it was not going to move.

The vertical member is the centercase brace, I'm building from a drawing which shows the shape of the hull and the position of the centercase and rig, and the rest I'm making up as I go.
I've got the centercase sides cut from scrap ply salvaged from a freinds bathroom rebuild, and thats the next thing to be fitted.
Oh yes, years back a freind,  ( have more than one!) gave me a set of foils from a decent sized sailing dinghy so I already have the centerboard for this one.  Less to build! Sooner sailing!

Tuesday, April 26, 2011

School days with a difference.

Back to school.


Photos by  Justine Leigh.

A couple of years back I had the great privilege of teaching part time at Massey University, Auckland New Zealand. At first I was just there for the occasional presentation on a given subject, then I got a 6 week paper to run, and then at the beginning of the next year Course Leader Bruce Woods paid me the huge compliment of giving me two days a week ongoing.
 The subject was “Transport design” and my students were  specializing in automotive and marine design, my brief was to teach and supervise the design and building of  model and full sized projects as well as some which involved “paper projects” . I had classes in years two and three plus mentored some year four students in their grad year projects,  they were a wonderful bunch of young people, almost all of whom worked hard and did well. 
Teaching these classes taught me a great deal, I had to stay a lot more than one page of the book  ahead of them as they were all of them pretty bright, and I spent a lot of time researching and swotting up ( cramming!) on each subject before standing up in front of them in the classroom, but even so I think that they taught me at least as much as I taught them, it was a really great experience and I’m hugely pleased that I got the chance.
I was surprised and pleased to come across a Trade Me ad for one of the year three projects that I supervised,  in this case a group of students were given the use of three 8 hp Yamaha outboard motors with remotes, and sent off to design, build and race three boats. 
Remember that these had to be designed, materials sourced, built from scratch, tested and run within one semester while the participants were also taking other papers!  There were some very late nights in the  Schools well equipped workshop!
We did a “car” one as well, each team getting a little 1 ¾ hp Honda stationary motor and sent off to design and build a vehicle to travel as far as possible on 100ml of petrol, that’s about 45 mins on the motors most economical speed and the winning vehicle which was a prone ridden motorcycle with hub center steering ( built by the students with the tools and machinery in the College workshop remember ) and a mountain bicycle gear train worked well hewever we didn’t manage to get a really good venue. But the testing we did do gave us an estimate of fuel consumption in the high 800  miles per imperial gallon at about 20 miles  per hour which was pretty good, and I am sure that with a longer track and some fine tuning we'd have done even better.
For the boats teams were selected, three in two and two in the third team.  All three opted for triple hull configurations, the winning one with a comparatively wide and short central hull,  the boat being got up stylewise to suggest a stealth bomber. The other two had long slender hulls, one semi displacement with foil stabilizers and the other a very graceful boat with conventional but very slender stabilizing hulls.
Alistair Thompson, Sophie  Amesbury and Tom Bryan built “Tri Ski”,  a very smooth looking boat built to a high standard and which performed well in the tests.  I’d say that the wetted area was just a little high for the 8 hp motor, but that’s ok, this was to be a learning exercise and the boat was still a lot quicker than you’d expect from the power plant, the handling near perfect and the concept very well executed.
Above are some photos copied from the Trade Me on line auction site where Tri Ski was recently up for sale.
Well done all that class, I hope you look back on that year as fondly as I do.
John Welsford
( Very proud) Senior Visiting Tutor
Transport Design,
College of Creative Arts
Massey University.   2006 / 2008

Friday, April 15, 2011

The Hobbit, Coming to a movie theatre near you

Not far away from where I live is a village called Hobbiton.  Some of you will know of it, I read the book when I was about 10 or so, every few years read it again and it never pales.
Its the outdoor set for the movie, the inn, the stone bridge, the Hobbitt holes, the lake and the river, all there and eerily alive, a window into a fantasy.

Kiwi film director Peter Jackson did an incredible job of translating the three books of "Lord of the Rings" into visual form, and I had several encouters with the production at various times, A neighbour was one of the founding members of the special effects company whos work was so effective, I did some technical work for a company who made many of the weapons, went on the Great New Zealand Trail Ride, a 6 day cross country ride that my wife and daughter went on and I taggged along as crew and baggage truck driver.  The catering company was fresh from the movie set, and several of those horses which starred as mounts for the Nazghul were there in a much less dark role.
It was a huge production, and in a country as small as ours there will be few New Zealanders who do not know someone who has had a direct involvement with the production. Its almost a part of our national psyche.
Over the years I have been in the many areas where most of the outdoor sets were so the when the movies showed off New Zealand scenery like no other movie before,I really felt "at home" as I watched the big screen, that added enormously to the veracity of the story for me.  Now there will be another.
Here is an introduction.

http://www.wimp.com/thehobbit/

John Welsford

Saturday, April 2, 2011

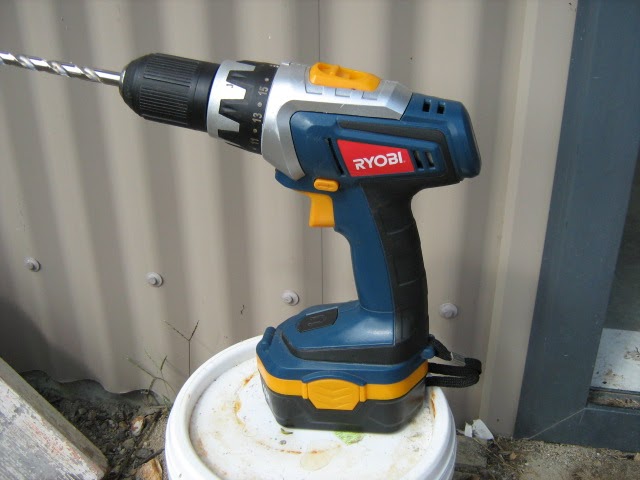
The cordless drill that wont.

Tool test. Ryobi
I generally tell people to buy good quality tools on the basis that a cheap tool that does not do the job is an expensive purchase. But sometimes I get hooked by a really good price on something that I’d not normally look twice at.  In this case the old Black and Decker 14.4 volt 2 speed cordless drill that I’d got through a customer rewards program about 10 years back was getting tired.
I’d gone through three sets of batteries, and the current set were ok but I could see the end of them off in the distance, and the mechanicals were getting very rattley. Time to think of a new one, my choice would have been a Makita 14.4 volt LI battery equipped unit, if you watch the guys building houses that’s a very popular unit. Light, powerful, tough and good parts backup.  But, its quite a lot of money, and that’s not in good supply around here so I was putting the decision off until later.
However, walking through the big box hardware down the road (You can imaging me at a Hardware Stores Anonymous meeting, “ My name is John and I’m a Hardware storeaholic”.  I should go in with a minder, walk around and come out having not bought anything, just to prove it can be done).  Anyways. There I was, coming along the aisle with some plastic plumbing fittings for the house in my hand and a sign jumped out and ambushed me. 
It said,  “ Ryobi 18v Cordless Drill kit.  High torque, 2 Speed, two batteries, quick charger, drill and driver selection  $69.90 ( that’s about fifty bucks US) ”
All in a nice plastic case encased in a cardboard sleeve with pretty pictures on it that promise that you’ll be an instant success at whatever you do if only you buy this tool.

Direct hit!
Some of the Ryobi tools that I’ve had have been very good, mostly the ones I’ve had for a long time.  In fact my first cordless drill was a 7.2 volt Ryobi with battery inside the handle, I miss it.  It was small, light, had enough grunt to drive medium sized screws, and had a good true running keyed chuck.  Absolutley no frills, but then it didn’t need any. 
It died after a long innings, and about the same time I had a bunch of Fly Buys points about to drop off if I didn’t use them so the B&D came into my life, and its done well. I’ve had three other B&D cordless drills since that, all have been so bad that I wouldn’t even give them away.
So, home came the Ryobi, first impressions were ok, it fit the hand well, was reasonably balanced, the variable speed trigger works smoothly and is in the right place, the battery though is a pig to get on and off,  I’ve slight arthritis in my thumb joints and it takes considerable pressure to get the battery clips disengaged from the drills body in order to remove it to put it in the charger. Yes I can do it, no its not really a big deal, just annoying.
The charger, I plugged it in, dropped a battery in it, and a green light came on.  Ok, came back in half an hour, it turned the drill over half a dozen revolutions and carked it.
Tried again, read through the very confusing section on charging in the book of words, and tried again.  Green light, no result.  But there are two lights on the charger, and a tiny recessed button between them.  Whats that for?
Its printed on the label on the charger, true, but that’s not that clear either, it doesn’t work unless the battery is in there first.
Hmmm, try it with the battery in, push the button.  RED light came on.  Left it for a while, bingo, the green light comes on when charged. Ok, got that.
So, off to work, reasonable torque, not as much though as the tired old B&D even now, the slip ring behind the chuck that changes it from one torque setting to another is too easy to move which means that it goes from drill (no torque limitation ) to one of the settings where it stops and growls at you if its required to work too hard and you have to stop and reset it.
But its still a drill, and still does its job, or would if the chuck was a bit better.
This is the real grumble.  While it is fine with hexagonal shaft screwdriver bits, its not able to hold a drill bit with any competency, any size at all, any torque of any consequence and no matter how tight you wring the thing up  the chuck goes around without the drill.  You know how a drill bit hangs up a little when it gets to the other side of a piece of metal?  This one allows the drill to stop while the chuck merrily goes on discharging the battery.  Even with aluminium or copper. Or wood for that matter which makes it really annoying.
So,  I’ve a drill that can only be used as a screwdriver, and STILL need to buy another cordless drill.
I should take my own advice.
John Welsford


Friday, April 1, 2011

Lighting up the trailer.

Tail lights for the trailer.
A new boat will always have a few things that need to be altered or added to make it ones own, and there can be much quiet pleasure in doing that. With a boat that comes home on its trailer that puttering around with tools brings the pleasure home into the backyard thus extending the involvement with boating and the water into time that should really be spent mowing the lawn or whatever.  It’s a much more pleasant way to spend an afternoon.  Agreed?
However, boats on trailers also have trailers to customize, and while I’m not as enthusiastic about that prospect it has to be done.  When I got this wee boat of mine  she had a piece of white plastic square section tube, all wired up and looking nice, but it had no way of properly mounting it on the after end of the boat, it bounced around chewing up the varnished coamings and toe rails and, to be honest was not that secure when under way on the road.
In the end it dropped off and destroyed one of the lights which meant that doing something about it came abruptly to the top of the “to do” list which was feeling good about having reduced to  about 2 pages long.
So,  with bottom lip out, I dragged a piece of 20 x 90 ( ¾ in x 3 ½ in about ) pine out of the rack and cut it to the same “beam” as the trailer across the mudguards.  Went down to Super Cheap Autos (the Wal Mart of the Australian and New Zealand motor parts world, you can have cheap or good quality, one guess what they have!) and bought a pair of tail lights with tail, indicator and stop lights plus a clear window for the tail light to illuminate the number plate.
The cable and plug from the old system was ok, I checked all the wires for continuity using a 12 volt battery charger and a spare bulb from one of the discarded lights as a test rig to ensure that although it had the dreaded black corrosion on what should have been bright copper wire at one end, it would work.  I had plenty to spare so cut it back to the bright stuff at both ends and after tinning the ends with solder coated the ends of the insulation with silicon to try and avoid that in the future. While it wont ( hopefully) be coming into contact with salt water it will be out in the weather so some care was warranted.
Now, the real problem here was how to mount said lights on the back of the boat, and while the boat itself does not present much in the way of opportunity the outboard motor bracket is just right.  Right height, aft of the transom, nothing to obstruct it and clear of the boat at the sides so the forward facing clearance lights would be easily visible.
I’d recently changed the woodwork on the bracket, it had been such that the power head of the outboard motor had not sufficient clearance from the transom to allow it to be easily operated so I’d made a new wooden pad that moved the motor out 20mm and up 50mm which made life very much easier when using the little 3 hp longshaft Tohatsu.  ( I’ll tell you about that motor another time, I’m quietly reasonably impressed with it.)  That meant that the top edge of the motor pad formed a 180mm wide, 36mm thick tongue sticking up 120mm from the metal part of the rise and fall bracket.
I made a couple of pads, just a couple of mm thicker than the “tongue”, each pad the depth of the  light board and about 80mm long, then screwed a section of the same 20 x 90 across to form a socket into which the “tongue” fit reasonably neatly.  I didn’t want to fight with it to get it on or off, but I didn’t want it too sloppy either and it took a couple of dry assembly runs to get it right.
Glue and screw, screws overlapping where they went through the spacer pads and the two main pieces so it cant split off, added a piece of plywood as a number plate mount and painted it with white housepaint.
Mounted the lights and wired it up.  Electricity was invented just to annoy me, did you realize that?  Other people have no trouble at all, but me?  Grrrrrrrrrrrrrr! 
But I got it done, all ends tinned, all insulation silicone at the end of the shielding, all wiring properly secured and with some slight faffing around SURPRISE ! It all worked!  !  Drawing a circuit diagram before I started and being very careful with the many colours in the wires must have paid off.

The outboard bracket, yes I should have reorientated the pic before I put it in here, but you can see how it works.


The 20 x 90 light bar with the bracket ready to trial fit . Thats scrap plywood left over from a house project, you use what you've got.


Same again with the orientation of the pic, sorry. But thats the lightboard all mounted up, shock cord stabilising cord visible at the far end, I tried to secure the wiring with hot melt glue but it doesnt want to stick and I ended up with stainless steel cable clips.


The finished result, looks good, nice and tidy, easy to mount and dis, highly visible and about 3 hours work in total.

I added some reflectors so it will be more easily seen by following cars, stabilized the rig with a couple of shock cords through the fairleads on the stern quarters to the mooring cleats, run the cable to the car along the side decks inside the sheet and stay points and out through the bow fairleads, through the trailer winch post and thence to the car, all nice and secure but will only take a couple of minutes to rig.
 Should I wish to use the trailer without the boat, the lightbar will simply be strapped across the back of the trailer frame with the shockcords, and when left in the car park while I sail off into the sunset will fit comfortably into the car, cable and all.
Tick. One less job on that %(*^%#  list.
Good, now to go sailing.
John Welsford


Friday, March 4, 2011

More maintenance on the trailer.

Wheel bearings.
Vital, and often problematic on a trailer that has to be dunked in the water when launching and retrieving a boat.  Heavily loaded, dunked into the water when the wheel has been run for miles and is warm, often poorly maintained, and frequently undersized or poorly specified for the weight of the load trailer wheel bearings are an item that need to be inspected regularly.
I had a very slow leak in the left side tyre, it was gradually going flat, taking its time about it but definitely not ready for the next trip out.  So up on the jack, under went the blocks, off with the wheel and away to the local service station for a fix and some new air.
It had a woodscrew through it, not a stainless one which suggests that it was not one of mine but a nuisance nevertheless.
But while it was off, I gave the hub a spin and it felt very tight, would not spin without some force applied.  I had been touching it at each stop and at our destination to see if it was running hot and it was ok in that respect, so there was some detective work required.
First step.  Drop that side back on the blocks I’d put under for safety, and lifted the other wheel to see if that spun freely.  Yup, gentle spin and it ran for four or five turns so there was a difference.
The hubs on this are good ones, solid, very well fitted end caps, and when the one I was investigating came off it exposed a substantial stub with castellated nut to retain the hub and bearings.
The grease appeared fine, none of the cloudiness typical of water contamination, so out came the split pin and off came the nut, a gentle tug and the inner race came out.  Taper rollers!  Serious bearings!  Open ones though and no seals. No sign of any damage, the races were not pitted, the rollers all in good order and the hub was till stiff to rotate.
Pull, deep breath and PULL! And off came the hub, the rear/ inner bearing looked fine, no sign of any problem, so it was time for a head scratch.
Hmmmm?  I wonder, the triple lip seal at the back looked totally dry. Just the inner lip had any grease, none on the outer two.  Push the hub in and out, the seal was a very tight fit into its groove in the back of the hub.  Very tight, too tight!  I went around the other side and got in behind the wheel with a mirror, yes there were signs that there was grease on the seal there, so went back and assembled the one I’d been working on.
A tiny smear of marine grease, just a faint wipe, and gently reassemble it. You would not believe the difference! 
With the wheel on, it spun for the same 4 or 5 turns, victory!


Thoughts, taper rollers are good, but I’d prefer to see seals on the races so I’ll take the  hubs to bits during the winter maintenance and will see if there are double sealed ball races that will take an end load in that size,  whatever the result of my enquiries I’ll buy a set to carry in the boats spares, and will also buy a fistful of the right sized split pins so I can put a new one in every time rather than rely on one that’s been bent and straightened several times.  I’ll need to carry some  grease, there is a brand of Vitamin C fizzy drink tabs in our pantry, and I’ll grab the tube container when they are all gone as its about the right size and has a good solid screw cap.
Add to the boats tools, a brass drift to drive the bearing inner and outer races out and to refit new ones, doing this job on the side of the road is bad enough but its way harder if you have to use improvised tools.

On a more positive note, on Monday Denny and I went over to Te Awamutu about 40 km away, and after doing the business we’d gone there for drove down to Lake Ngaroto to show her what the place was like and to take the dog for a walk. She was impressed and we’ll take the little boat over there in a week or so for a sail and an overnight stay .  Its not big, but its very quiet and sheltered, will make a nice place to spend a night tucked up in the reeds among the birds that this conservation project was engendered to protect and foster.

My next project?  Realign the bunks and rollers on the trailer.  I’ve been pouring a mix of oil and kerosene on the nuts and bolts so hope that these come undone without too much force.
JohnW